DRAFT
This section describes NURBS curve and surface related modelling tools.
Note that pressing the <F1> key in tool dialog windows
can be used to directly jump to the appropriate
sub-section of this part of the documentation.
All NURBS modelling tools are accessible via the "Tools" menu of the
main window or the toolbox. In addition, there are also corresponding
scripting interface commands.
Many modifying tools work on multiple selected objects and execute the selected operation on all those selected objects in the order of their appearance in the current level.
Tools that take only NURBS curves or only NURBS surfaces from the selection will warn if the selection contains objects of unsuitable type, but processing will continue regardless.
In case of an error, however, the processing of multiple selected objects immediately stops, possibly leaving modified and unmodified objects behind.
If an operation executed successfully on an object, the selected points may be removed from the object. Then the notification of the object will be run. The notification of the parent object(s) will be run after processing of all selected objects finished.
Tools that create tool objects may use the clipboard to move the new children around, i.e. the clipboard contents are lost afterwards.
These tools create parametric curve objects.

Radius, Arc, Sections, Order.
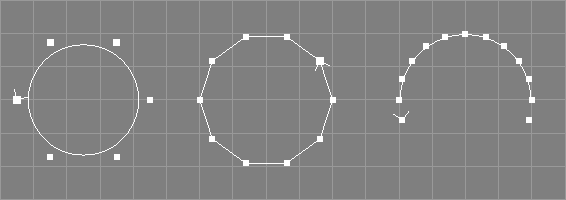
This tool creates a non-rational B-Spline curve with Sections+1+Order (Arc=360.0) or Sections+1+(Order/2) (other Arc values) control points in the XY plane. The control points are arranged in a circle of the given radius, centered around the origin. This gives the curve a circular appearance (see image above) but it is not a true circle: If only few control points are used, the radius of the circular curve is clearly smaller than the specified radius value (see the left curve in the image above). Furthermore, shape, parameterisation, and curvature of the B-Spline curve are not exactly as one would expect from a circle. To create true circular curves, the NURBCircle tool (see below) should be used instead.
Sections must be at least 1.
If Arc is 360.0, the first n control points of the new curve will be identical to the last n (where n is Order-1). Compare the left and middle curves in the image above which are of order 4 and 2 respectively, the first having 3 and the latter just having 2-1=1 equal control points. If Arc is 360.0, the curve will also be marked periodic and the generation of multiple points will be enabled, so that point edit actions know that they may need to move two points (see also section Multiple Points).
If Arc is smaller than 360.0, the curve will be open, and, as is natural for a B-Spline curve, will not interpolate the first and last control points unless the order is 2 (see the right curve in the image above, which was created with an arc value of 180.0, 10 sections, and order 4).
Radius, Arc.
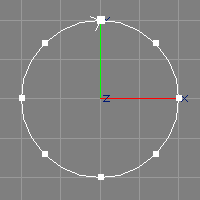
The NURBCircle tool creates a circular NURBS curve of desired radius and arc in the XY plane, centered around the origin (see also the image above). The order of the curve will be 3. The number of control points used differs according to the arc, e.g. 9 points for full circles, 5 for half circles, 3 for a quarter circle.
The NURBS curve created by the NURBCircle tool is rational (uses weights). This means, editing the curve (e.g. moving control points) may lead to unpredicted results (the curve does not behave exactly as wished). If the curve is to be modified further, a closed B-Spline, created with the Circular B-Spline tool (see above), should be used instead. Additionally, the created curve will be marked as closed and the generation of multiple points will be enabled, so that point edit actions know that they may need to move two points. See also section Multiple Points.
A NURBS circle created by this tool can be used to easily create a NURBS torus by moving the circle along X a bit and then revolving it. The amount of movement determines the radius of the torus, whereas the radius of the circle determines the thickness.
Width, Height
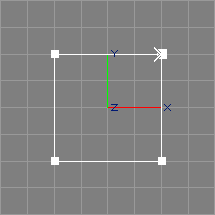
The rectangle tool creates a non-rational, piecewise linear, planar, centered NURBS curve of rectangular shape and twice the specified width and height in the XY plane (see also the image above).
The created curve will be marked as closed and the generation of multiple points will be enabled, so that point edit actions know that they may need to move two points. See also section Multiple Points.
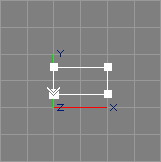
The TrimRect tool takes the selected NPatch objects (or NPatch providing objects[*]) from the selection. If the current level is inside a NPatch object, the respective parent object is used.
For each selected patch, the TrimRect tool creates a
non-rational, piecewise linear, planar NURBS curve of rectangular
shape in the XY plane, that fits in the (u, v) parameter space of this NURBS
patch, for use as outer trim curve. See also the image above, depicting a
rectangle for a NPatch defined on the knot intervals
0.0, 0.0, 1.0, 1.0
and
0.0, 0.08
The created curve will be marked as closed and the generation of multiple points will be enabled, so that point edit actions know that they may need to move two points. See also section Multiple Points.
The "CreateAtMark" option is ignored.
See section Trim Curves for a more detailed discussion of trim curves and how to use the rectangular curve created by the TrimRect tool.
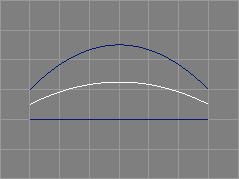
The tween curve tool takes two NURBS curves from the selection and requests a parameter r.
The selected NURBS curves will be interpolated (tweened) and a new curve incorporating features from both of the original curves will be created. See also the image above. The parameter r defines the ratio of influence of the first and the second curve (the latter using 1-r).
|-NCurve             |-NCurve
|-NCurve     ==>     |-NCurve
                     |-NCurve
The two curves must be of the same length and order. They need not be defined on the same knot vector, however.
If a third curve is selected, the parameter r is ignored and this third curve defines the ratio of influence with its y coordinates.
If one of the curves knot vector types is "Custom" or the
respective knot vector types are different, the resulting
knot vector type will be "Custom" and the knot values will
also be interpolated/tweened. Otherwise a matching knot vector will be
generated according to the type.
The original NURBS curves will not be deleted by this tool.
See also the documentation of the corresponding scripting interface command tweenNC.
To tween NURBS curve providing objects or incompatible NURBS curve objects,
a Script object must be used, as shown in the distributed example scene
file "tweenc.ay" and script "tweenc.tcl".
These tools modify parametric curve objects.
Unless noted otherwise, PV tags are not supported/modified by these tools.
The revert tool takes all NCurve, ICurve, and ACurve objects from the selection.
The direction of the selected curves will be reversed. This tool also reverts the relative knot distances of NURBS curves so that for example a NURBS curve defined on the (asymmetric) knot vector
"0.0 0.0 0.0 0.75 1.0 1.0 1.0"
will get the new knot vector
"0.0 0.0 0.0 0.25 1.0 1.0 1.0"
after reversal. This ensures that the shape of a NURBS curve does not change during reversal. Interpolating and approximating curves may change their shape as the underlying interpolation/approximation algorithms are not direction-invariant.
The direction of a curve is shown as a small arrow at the end of the curve.
Eventually selected points will still be selected after this operation.
See also the documentation of the corresponding scripting interface command revertC and the related tools for surfaces Revert U Surface Tool and Revert V Surface Tool.
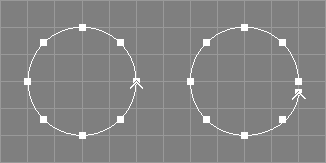
The open tool takes all NCurve, ICurve, ACurve, and ConcatNC objects from the selection.
The curves will be opened. For closed NCurve objects, the last point will be moved away from the first (multiple end points will be managed correctly), see also the image above.
For periodic NURBS curves, the last p points will be moved away from the first p (where p is the degree of the curve).
For ACurve, ICurve, and ConcatNC objects the "Closed" attribute
will be cleared and no control points will be modified.
The open tool can be conveniently invoked from view windows
using the keyboard shortcut <(>.
See also the documentation of the corresponding scripting interface command openC.
The close tool takes all NCurve, ICurve, ACurve, and ConcatNC objects from the selection.
The curves will be closed. For NCurve objects the last point will be made identical to the first, however, this does not guarantee a closed curve shape unless the knot vector is clamped.
For ACurve, ICurve, and ConcatNC objects the "Closed" attribute
will be set and no control points will be modified.
The close tool can be conveniently invoked from view windows
using the keyboard shortcut <)>.
See also the documentation of the corresponding scripting interface command closeC.
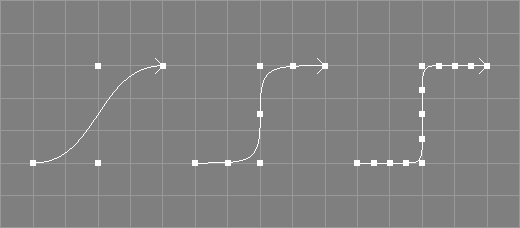
The refine tool takes all NCurve, ICurve, and ACurve objects from the selection.[*]
The selected curves will be refined by inserting a control point in the middle of each control point interval, changing the shape of the curve. The original control points will not be changed. For periodic NURBS curves, no control points will be inserted in the last p intervals (where p is the degree of the curve), this allows to maintain the periodicity, see also the image below where a periodic curve of length 9 (8 sections) has been refined, resulting in a periodic curve of length 15 (not 17).

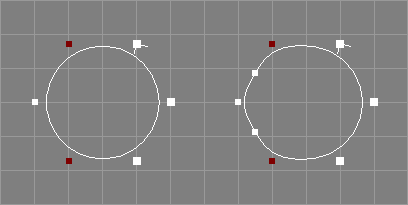
See also the documentation of the corresponding scripting interface command refineC.
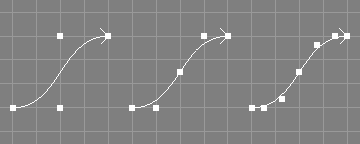
The refine knots tool takes a number of NURBS curves from the selection.
The knot vectors of the selected NURBS curves will be refined by inserting a knot in the middle of each inner knot interval without changing the shape of the curve.
Because a new knot is inserted in the middle of each interval, knot vectors of type NURB and B-Spline will not change in type. See the image above for an example of a successive refinement of a simple NURBS curve. Note that the shape of the curve does not change, but the position of certain control points does.
The point selection will be removed from the processed objects.
See also the documentation of the corresponding scripting interface command refineknNC and the related tool for surfaces Refine Knots Surface Tool.
The refine knots with tool takes a number of NURBS curves from the selection and requests a vector of new knot values.
The knot vectors of the selected NURBS curves will be refined by inserting all knots from the specified vector at once. New control points will be added and the position of old control points may be changed in the progress. The resulting knot vector must be valid, otherwise an error will be reported and the respective curve is not changed.
Note that the shapes of the curves do not change, but the position of certain control points does.
The point selection will be removed from the processed objects.
See also the documentation of the corresponding scripting interface command refineknNC and the related tool for surfaces Refine Knots With Surface Tool.
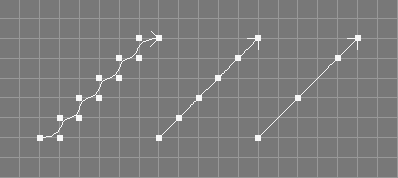
The coarsen tool takes a number of NURBS curves from the selection.
Every second control point in the control vectors of the selected NURBS curves will be deleted. If the new length of the curve would be smaller than the current order, the coarsen tool will not change anything.
For periodic curves the coarsen tool will not remove control points from the first (last) p intervals (where p is the degree of the curve).
For closed curves, the coarsen tool will not remove the last point.
The coarsen tool will also remove knot values from curves with custom knot vectors.
The point selection will be removed from the processed objects.
See also the documentation of the corresponding scripting interface command coarsenNC.
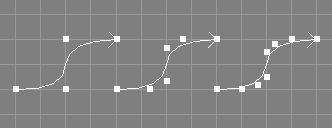
The elevate tool takes a number of NURBS curves from the selection and additionally requests an integer value.
The order of the selected NURBS curves will be raised by the specified integer value without changing the shape of the curve.
If the knot vector of the curve is not clamped, it will be clamped automatically. The knot type of the curve will be changed to custom. New control points will be added and the position of old control points may be changed in the progress.
The point selection will be removed from the processed objects.
See also the documentation of the corresponding scripting interface command elevateNC and the related tool for surfaces Elevate Surface Tool.
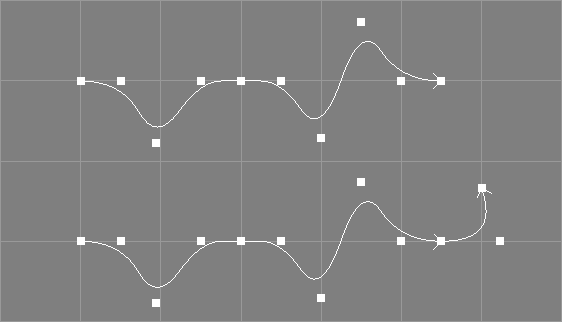
The extend tool takes a number of NURBS curves from the selection and additionally requests a point in space.
The selected NURBS curves will be extended to the specified point in space without changing the already existing shape of the curves.
If the knot vector of a curve is not clamped at the end, it will be clamped automatically. The knot type of each curve will be changed to custom. A new control point will be added and the position of old control points may be changed in the progress.
Due to the constraints that only one control point will be added to the curve and the current shape must be maintained, the new curve may form unusual/unwanted big arcs if the new point deviates too much from the tangent in the endpoint of the original curve.
The point selection will be removed from the processed objects.
See also the documentation of the corresponding scripting interface command extendNC.
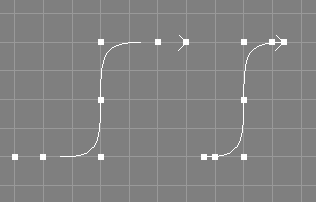
The clamp tool takes a number of NURBS curves from the selection.
The knot vectors of the selected NURBS curves will be changed using knot insertion so that the first and the last knot have a multiplicity equal to the order of the curve, without changing the shape of the curve. The curve will interpolate the first and the last control point afterwards (if also the weights of those points are 1.0).
The knot type of the curves will be changed to "Custom".
The point selection will be removed from the processed objects.
In Ayam versions prior to 1.18 it was an error if the curve was already clamped at either side, this is no longer the case. Furthermore, curves with multiple knots in the end region(s) could not be clamped, this works ok now.
See also the documentation of the corresponding scripting interface command clampNC and the related tool for surfaces Clamp Surface Tool.
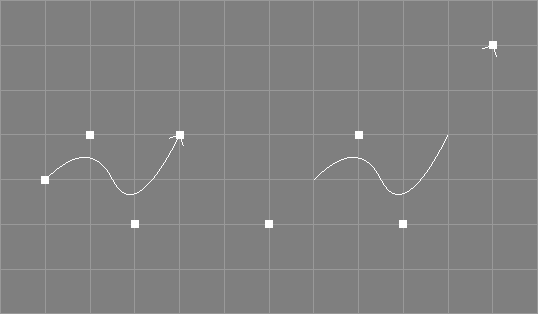
The unclamp tool takes a number of NURBS curves from the selection.
The knot vectors of the selected NURBS curves will be
changed so that there are no multiple knots at the respective ends
of the knot vectors. The shape of the curve will not change but the
position of some control points will. The knot type of the curve can
be changed to type "Custom".
Unclamping is not an exact reversal of clamping (and vice versa).
However, as the unclamp operation only works on completely clamped curves, the unclamp tool may need to clamp the curve first.
The point selection will be removed from the processed objects if the curve needs to be clamped before unclamping.
See also the documentation of the corresponding scripting interface command unclampNC and the related tool for surfaces Unclamp Surface Tool.
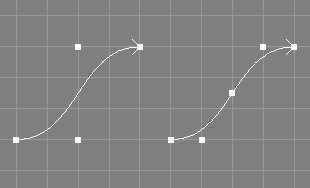
The insert knot tool takes a number of NURBS curves from the selection and requests two additional values, a parametric value u and an integer value i.
The specified knot value u will be inserted i times into the knot vector of the selected curves, without changing the shape of the curve(s).
The knot type of the curves will be changed to "Custom".
The point selection will be removed from the processed objects.
See also the documentation of the corresponding scripting interface command insknNC and the related tool for surfaces Insert Knot Surface Tool.
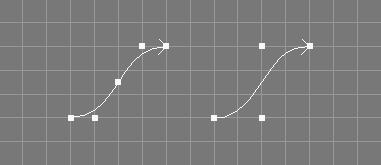
The remove knot tool takes a number of NURBS curves from the selection and requests three additional values, a parametric value t, an integer value r, and a tolerance value tol.
The knot at the specified parametric value t will
be removed r times from the knot vector of the selected curves if
the shape of the resulting curve does not deviate more than tol
from the original curve in any point. Since Ayam 1.20 the knot to remove
may also be specified using its (zero based)
index in the knot vector (i.e. by entering "-i 3" instead of
"0.5" for the knot vector
"0 0 0 0.5 1 1 1").
If the knot can not be removed r times due to the tolerance given, an
error is reported and the original curve is left unchanged.
If tol is "0.0" the remove knot tool tries to
work without changing the shape of the curve, i.e. only superfluous
knots will be removed.
If tol is "Inf" (infinity) the specified knot will be removed
regardless of potential curve changes.
The point selection will be removed from the processed objects.
See also the documentation of the corresponding scripting interface command remknNC and the related tool for surfaces Remove Knot Surface Tool.
The concat tool takes two NURBS curves from the selection.
The selected NURBS curves will be concatenated and a new third curve will be created.
|-NCurve             |-NCurve
|-NCurve     ==>     |-NCurve
                     |-NCurve
If one of the curves has weights, the resulting curve
will have weights too. If the knot type of the first curve
is "Custom", it will be converted to "NURB", otherwise the
knot type of the new curve will be that of the first selected curve.
Due to those changes of the knot values, the resulting curve might
differ from the original curves.
The original NURBS curves will not be deleted by this tool.
See also section ConcatNC Object.
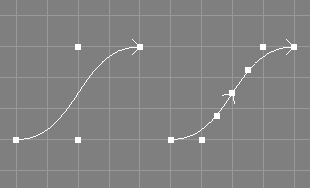
The split curves tool takes a number of NURBS curves from the selection and additionally requests a parametric value u.
The selected NURBS curves will be split into two NURBS curves at the designated parametric value u. The splitting process involves application of knot insertion, so that all new curves will get a custom knot vector.
|-NCurve     ==>     |-NCurve
                     |-NCurve
The original selected NURBS curve objects will be changed.
All new curve objects will be appended to the current level.
The point selection will be removed from the original curves.
See also the documentation of the corresponding scripting interface command splitNC and the related tool for surfaces Split Surface Tool.
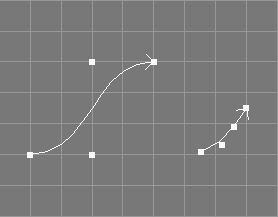
The trim curves tool takes all selected NURBS curves from the selection and additionally requests two parametric values, umin and umax.
The selected NURBS curves will be trimmed to the designated parametric range (umin, umax).
The trimming process involves the application of knot insertion so that the curves will get a custom knot vector.
The point selection will be removed from the original objects.
See also the documentation of the corresponding scripting interface command trimNC.
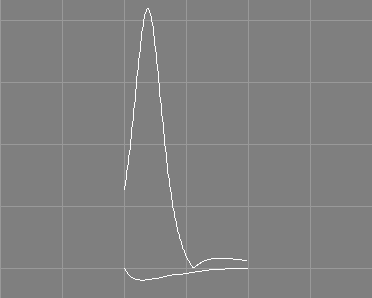
The plot curvature tool takes a number of NURBS curves from the selection and requests three additional values: the number of data points, the width value and the height value.
A new NURBS curve, depicting the curvature of the selected NURBS curve, will be created for each of the selected NURBS curves. The curvature plots will have a length defined by the number of data points and will be scaled to the specified width and by the specified height value. See also the image above.
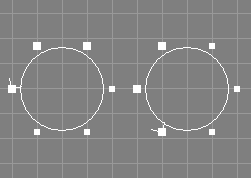
The shift closed curve tool takes a number of closed curves (NCurve, ICurve, and ACurve objects are supported), from the selection and requests one additional integer parameter i.
The control points of the curve(s) will be shifted i times. The parameter i may be negative to revert the direction of the shifting. For a simple closed curve, shifting with i=1, the first control point will get the coordinates of the former last control point. This means, positive shifts occur in the direction of the curve. Note that for closed and periodic NURBS curves, the multiple points will be managed correctly.
Eventually selected points will still be selected after this operation. See also the image above.
See also the documentation of the corresponding scripting interface command shiftC.
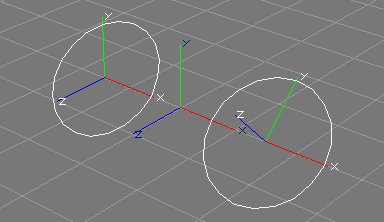
The To XY tool takes a number of NCurve, ACurve, or ICurve objects from the selection. The curves should be planar. Curves that form a single straight line are not supported.
The control points of the curve(s) will be rotated, so that they are in the XY plane of the respective object space defined by the curve object(s). Additionally, the rotation attributes of the curve object(s) will be changed so that the curve does not change its orientation with regard to other objects or the world space. The scale attributes will be reset to 1.0.
See also the image above, where the left curve, planar but not defined in the XY plane will be changed, so that it is defined in the XY plane (mind the two different object coordinate systems in conjunction with the world coordinate system in the middle).
A reverse operation, apart from undo, would be to apply the current transformation attributes to the control points of the curves.
See also the documentation of the corresponding scripting interface command toXYC.
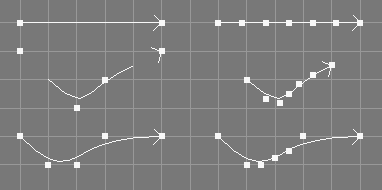
The make compatible tool takes a number of NURBS curves from the selection and requests a level.
The curves will be made compatible, so that, based on the level parameter given, they are of the same length, order and defined on the same knot vector.
This tool does not change the geometry of the curves. However, since clamping, degree elevation, and knot insertion may be used on the curves, their order, knot vectors, and control points may be changed.
The orders of all curves will simply be raised to the maximum order of all curves; no attempt is made to check, whether lowering orders leads to a simpler result.
The point selection will be removed from the original objects.
See also the documentation of the corresponding scripting interface command makeCompNC and the related tool for surfaces Make Compatible Tool.
The rescale knots to range tool takes a number of NURBS curves from the selection and requests a range (two float values).
The knot vectors of the curves will be scaled, so that their first and last values match the given range.
Since Ayam 1.20 the knot type of the curve does
not have to be "Custom" anymore. Furthermore, rescaling the knots
does not change the knot type.
This tool does not change the geometry of the curves.
See also the documentation of the corresponding scripting interface command rescaleknNC and the related tool for surfaces Rescale Knots to Range Surface Tool.
The rescale knots to mindist tool takes a number of NURBS curves from the selection and request a minimum distance value.
The knot vectors of the curves will be scaled, so that no two knots have a distance smaller than the given minimum distance (except for multiple knots).
Since Ayam 1.20 the knot type of the curve does
not have to be "Custom" anymore. Furthermore, rescaling the knots
does not change the knot type.
This tool does not change the geometry of the curves.
See also the documentation of the corresponding scripting interface command rescaleknNC and the related tool for surfaces Rescale Knots to Mindist Surface Tool.
The collapse tool expects a selected NURBS curve or NURBS patch and a number of selected (tagged) control points (see section Selecting Points for information on how to select (tag) control points).
The selected control points will be made a single multiple point, all points will get the coordinate values of the last tagged point. This means that the shape of the curve/surface can change.
The point selection will be removed from the original objects.
The explode tool expects a selected NURBS curve or NURBS patch and a number of selected (tagged) multiple points (see section Selecting Points for information on how to select (tag) control points).
The points forming the selected multiple points will be made to simple points again and may be edited separately. The shape of the curve/surface will not change.
The control points should immediately be edited (i.e. moved
apart) after exploding, to avoid that they automatically collapse to a
multiple point again, as Ayam will re-create the multiple points on
several occasions like reading of a scene, inserting/deleting points,
or applying the NCurveAttr/NPatchAttr property if all single control
points of the multiple point(s) still have identical coordinate values
(and the "CreateMP" attribute of the curve or patch object is activated).
The point selection will be removed from the original objects.
To explode all multiple points of a curve/surface at once, disable
the "CreateMP" attribute.
These tools create parametric surface objects.
Radius.
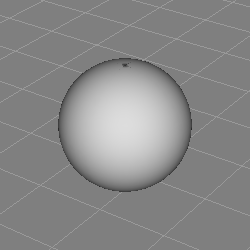
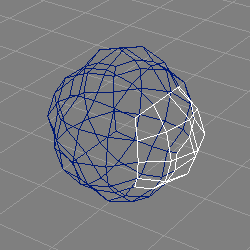
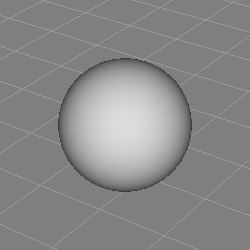
The NURBSphere tool creates a half circle NURBS curve of given radius and revolves it about the Y axis thus forming a sphere.
Due to the construction method, the NURBS surface is degenerate at the poles which can lead to shading artefacts (compare the image above).
None.
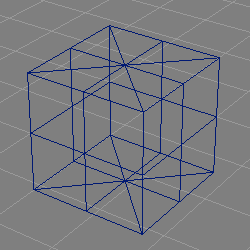
The NURBSphere2 tool creates a Cobb NURB sphere of radius 1.0, consisting of six NURBS patches arranged in a configuration resembling a box, see also the above image.
The NURBS patches are of comparatively high order (5).
The revolve tool takes the selected objects from the selection.
The tool creates a Revolve object, and moves the selected objects to it.
|-NCurve     ==>     +-Revolve
                      \-NCurve
See section Revolve Object for more information regarding the revolve object.
This tool uses the object clipboard to move the objects so that the original clipboard contents are lost when this tool finishes.
Holding down the <Ctrl> key while clicking on the
corresponding icon in the toolbox will keep the parameter curve
selected and the current level will also be changed.
The swing tool takes the selected objects from the selection.
The tool creates a Swing object, moves the selected objects to it, and rotates the first curve to the YZ-plane and the second curve to the XZ-plane. If the respective curve is of type NCurve, ICurve, or ACurve, the control points will be modified and the rotation attributes will be reset, other objects will be rotated by their transformation attributes. The rotation will be recorded in the undo buffer.
|-CrossSection(NCurve)           +-Swing
|-Trajectory(NCurve)     ==>      |-CrossSection(NCurve)
                                  \-Trajectory(NCurve)
See section Swing Object for more information regarding the Swing object.
This tool uses the object clipboard to move the objects so that the original clipboard contents are lost when this tool finishes.
Holding down the <Ctrl> key while clicking on the
corresponding icon in the toolbox will keep the parameter curves
selected and the current level will also be changed.
The extrude tool takes the selected objects from the selection.
The tool creates an Extrude object, and moves the selected objects to it.
|-NCurve             +-Extrude
|-NCurve     ==>      |-NCurve
                      \-NCurve
See section Extrude Object for more information regarding the Extrude object.
This tool uses the object clipboard to move the objects so that the original clipboard contents are lost when this tool finishes.
Holding down the <Ctrl> key while clicking on the
corresponding icon in the toolbox will keep the parameter curve
selected and the current level will also be changed.
The sweep tool takes the selected objects from the selection.
The tool creates a Sweep object, moves the selected objects to it, and rotates the first curve object to the YZ plane. If the cross section curve is of type NCurve, ICurve, or ACurve, the control points will be modified and the rotation attributes will be reset, other objects will be rotated by their transformation attributes. The rotation will be recorded in the undo buffer.
|-NCurve             +-Sweep
|-NCurve     ==>      |-NCurve
                      \-NCurve
See section Sweep Object for more information regarding the Sweep object.
This tool uses the object clipboard to move the objects so that the original clipboard contents are lost when this tool finishes.
Holding down the <Ctrl> key while clicking on the
corresponding icon in the toolbox will keep the parameter curve
selected and the current level will also be changed.
The bevel tool takes the selected objects from the selection.
The tool creates a Bevel object, and moves the selected objects to it.
|-NCurve             +-Bevel
             ==>      \-NCurve
See section Bevel Object for more information regarding the Bevel object.
This tool uses the object clipboard to move the objects so that the original clipboard contents are lost when this tool finishes.
Holding down the <Ctrl> key while clicking on the
corresponding icon in the toolbox will keep the parameter curve
selected and the current level will also be changed.
The cap tool takes the selected objects from the selection.
The tool creates a Cap object, and moves the selected objects to it.
|-NCurve             +-Cap
|-NCurve     ==>      |-NCurve
                      \-NCurve
See section Cap Object for more information regarding the Cap object.
This tool uses the object clipboard to move the objects so that the original clipboard contents are lost when this tool finishes.
Holding down the <Ctrl> key while clicking on the
corresponding icon in the toolbox will keep the parameter curve
selected and the current level will also be changed.
The birail1 tool takes the selected objects from the selection.
The tool creates a Birail1 object, and moves the selected objects to it.
|-NCurve             +-Birail1
|-NCurve     ==>      |-NCurve
|-NCurve              |-NCurve
                      \-NCurve
See section Birail1 Object for more information regarding the Birail1 object.
This tool uses the object clipboard to move the objects so that the original clipboard contents are lost when this tool finishes.
Holding down the <Ctrl> key while clicking on the
corresponding icon in the toolbox will keep the parameter curve
selected and the current level will also be changed.
The birail2 tool takes the selected objects from the selection.
The tool creates a Birail2 object, and moves the selected objects to it.
|-NCurve             +-Birail2
|-NCurve              |-NCurve
|-NCurve     ==>      |-NCurve
|-NCurve              |-NCurve
                      \-NCurve
See section Birail2 Object for more information regarding the Birail2 object.
This tool uses the object clipboard to move the objects so that the original clipboard contents are lost when this tool finishes.
Holding down the <Ctrl> key while clicking on the
corresponding icon in the toolbox will keep the parameter curve
selected and the current level will also be changed.
The gordon tool takes the selected objects from the selection.
The tool creates a Gordon object, and moves the selected objects to it.
|-NCurve             +-Gordon
|-NCurve              |-NCurve
|-Level               |-NCurve
|-NCurve     ==>      |-Level
|-NCurve              |-NCurve
                      \-NCurve
See section Gordon Object for more information regarding the Gordon object.
This tool uses the object clipboard to move the objects so that the original clipboard contents are lost when this tool finishes.
Holding down the <Ctrl> key while clicking on the
corresponding icon in the toolbox will keep the parameter curve
selected and the current level will also be changed.
The skin tool takes the selected objects from the selection.
The tool creates a Skin object, and moves the selected objects to it.
|-NCurve             +-Skin
|-NCurve     ==>      |-NCurve
|-NCurve              |-NCurve
                      \-NCurve
See section Skin Object for more information regarding the Skin object.
This tool uses the object clipboard to move the objects so that the original clipboard contents are lost when this tool finishes.
Holding down the <Ctrl> key while clicking on the
corresponding icon in the toolbox will keep the parameter curve
selected and the current level will also be changed.
The trim tool takes the selected objects from the selection.
The tool creates a Trim object, and moves the selected objects to it.
|-NPatch             +-Trim
|-NCurve     ==>      |-NPatch
|-NCurve              |-NCurve
                      \-NCurve
See section Trim Object for more information regarding the Trim object.
This tool uses the object clipboard to move the objects so that the original clipboard contents are lost when this tool finishes.
Holding down the <Ctrl> key while clicking on the
corresponding icon in the toolbox will keep the parameter curve
selected and the current level will also be changed.
The tween tool takes two NURBS patches from the selection and requests a parameter r.
The selected NURBS patches will be interpolated (tweened) and a new patch incorporating features from both of the original patches will be created. The parameter r defines the ratio of influence of the first and the second patch (the latter using 1-r).
|-NPatch             |-NPatch
|-NPatch     ==>     |-NPatch
                     |-NPatch
The two patches must be of the same width, height, uorder, and vorder. They need not be defined on the same knot vectors, however.
If one of the patches knot vector types is "Custom" or the
respective knot vector types are different, the resulting
knot vector type will be "Custom" and the knot values will
also be interpolated/tweened. Otherwise a matching knot vector will be
generated according to the type.
The original NURBS patches will not be deleted by this tool.
See also the documentation of the corresponding scripting interface command tweenNP.
These tools modify parametric surface objects.
Unless noted otherwise, PV tags are not supported/modified by these tools.
The revert u tool takes a number of NURBS patches, IPatch, BPatch, or PatchMesh objects from the selection.
The control point arrays of the selected objects will be reversed in the U dimension (width). For NURBS patches this tool also reverts the relative knot distances of the corresponding knot vector so that the surface does not change in shape. For IPatch objects the respective derivatives are reverted.
PV tags will not be modified.
See also the documentation of the corresponding scripting interface command revertuS and the related tool for curves Revert Tool.
The revert v tool takes a number of NURBS patches IPatch, BPatch, or PatchMesh objects from the selection.
The control point arrays of the selected objects will be reversed in the V dimension (height). For NURBS patches this tool also reverts the relative knot distances of the corresponding knot vector so that the surface does not change in shape. For IPatch objects the respective derivatives are reverted.
PV tags will not be modified.
See also the documentation of the corresponding scripting interface command revertvS and the related tool for curves Revert Tool.
The swap uv tool takes a number of NURBS patches, IPatch, BPatch, or PatchMesh objects from the selection.
The U and V dimension of the selected objects will be swapped (width, height, and all other dimension related parameters will be exchanged) without altering the shape of the patches.
The point selection will be removed from the original object(s).
PV tags will not be modified.
See also the documentation of the corresponding scripting interface command swapuvS.
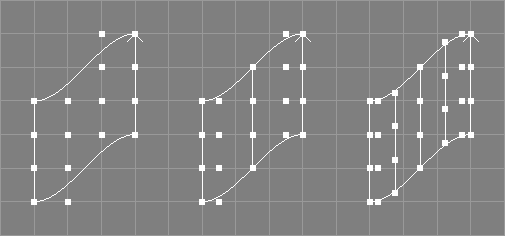
The refine knots surface with tool takes a number of NURBS patches from the selection.
The respective knot vectors of the selected NURBS patches will be refined without changing the shape of the patches. New control points will be added and the position of old control points may be changed in the progress (see also the image above).
The respective knot type of the patch may
be changed to "Custom".
The point selection will be removed from the original object(s).
There are also tools available that refine only the U or V knots.
See also the documentation of the corresponding scripting interface commands refineuNP and refinevNP and the related tool for curves Refine Knots Tool.
The refine knots with surface tool takes a number of NURBS patches from the selection and requests a vector of new knot values.
The respective knot vectors of the selected NURBS patches will be refined by inserting all knots from the specified vector at once. New control points will be added and the position of old control points may be changed in the progress. The resulting knot vector must be valid, otherwise an error will be reported and the respective patch is not changed.
The respective knot type of the patch may
be changed to "Custom".
The point selection will be removed from the original object(s).
There are also tools available that refine only the U or V knots.
See also the documentation of the corresponding scripting interface commands refineuNP and refinevNP and the related tool for curves Refine Knots With Tool.
The elevate surface tool takes a number of NURBS patches from the selection and additionally requests two integer values.
The order of the selected NURBS patches will be raised by the specified integer values without changing the shape of the patches.
If the knot vector of the patch is not clamped, it
will be clamped automatically. The knot type of the patch will
be changed to "Custom". New control points will be added and the position
of old control points may be changed in the progress.
The point selection will be removed from the original objects.
There are also tools available that elevate a patch in U or V direction only.
See also the documentation of the corresponding scripting interface commands elevateuNP and elevatevNP and the related tool for curves Elevate Tool.
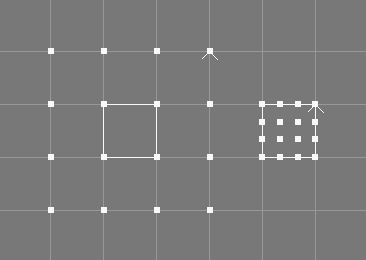
The clamp surface tool takes a number of NURBS patches from the selection.
The knot vectors of the selected NURBS patches will be changed using knot insertion so that the first and the last knot (in each direction) have a multiplicity equal to the order of the patch (in the respective direction).
The shape of the patches will not change but the position of some
control points will. The patches interpolate the first and the last control
points in the respective direction afterwards (if also the weights of those
points are 1.0).
The knot types of the patches will be changed to type
"Custom".
The point selection will be removed from the original object(s).
There are also tools available that clamp a patch in U or V direction only.
See also the documentation of the corresponding scripting interface commands clampuNP and clampvNP and the related tool for curves Clamp Tool.
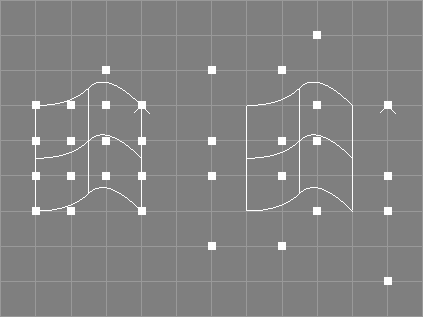
The unclamp surface tool takes a number of NURBS patches from the selection.
The knot vectors of the selected NURBS patches will be
changed so that there are no multiple knots at the respective ends
of the knot vectors. The shape of the patches will not change but the
position of some control points will. The knot types of the patches may
be changed to type "Custom".
Unclamping is not an exact reversal of clamping (and vice versa).
However, as the unclamp operation only works on completely clamped surfaces, the unclamp tool may need to clamp the surface first.
There are also tools available that unclamp a patch in U or V direction only.
The point selection will be removed from the original object(s) if the surface needs to be clamped for unclamping.
See also the documentation of the corresponding scripting interface commands unclampuNP and unclampvNP and the related tool for curves Unclamp Tool.
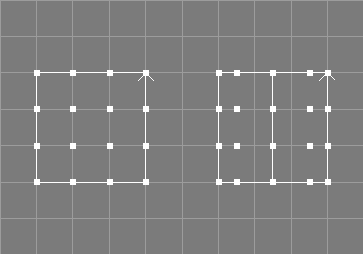
The insert knot surface tool takes a number of NURBS patches from the selection and requests two additional values, a parametric value t and an integer value i.
The specified knot (t) will be inserted i times into the knot vector of the selected patches, without changing their shape.
The knot type of the patch will be changed to "Custom".
This tool does not change the geometry of the patches.
The point selection will be removed from the original object(s).
See also the documentation of the corresponding scripting interface commands insknuNP and insknvNP and the related tool for curves Insert Knot Tool.
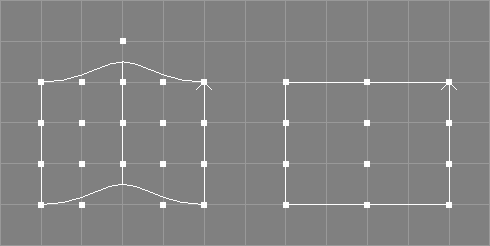
The remove knot surface tool takes a number of NURBS surfaces from the selection and requests three additional values, a parametric value t, an integer value r, and a tolerance value tol.
The knot at the specified parametric value t will be
removed r times from the knot vector of the selected surfaces if the
shape of the resulting surfaces does not deviate more than tol from
the original surfaces in any point. Since Ayam 1.20
the knot to remove may also be specified using its (zero based)
index in the knot vector (i.e. by entering "-i 3" instead of
"0.5" for the knot vector
"0 0 0 0.5 1 1 1").
If the knot can not be removed r times due to the tolerance given, an
error is reported and the original surface is left unchanged.
If tol is "0.0" the remove knot tool tries to
work without changing the shape of the surface, i.e. only superfluous
knots will be removed.
If tol is "Inf" (infinity) the specified knot will be removed
regardless of potential surface changes.
The point selection will be removed from the original object(s).
See also the documentation of the corresponding scripting interface commands remknuNP, and remknvNP and the related tool for curves Remove Knot Tool.
The split surface tool takes a number of NURBS patches from the selection and requests a parametric value t (in U or V parametric dimension, respectively).
The patches will be split at the parametric value t into two patches (in U or V parametric dimension, respectively) using knot insertion.
|-NPatch     ==>     |-NPatch
                     |-NPatch
The original patch object(s) will be modified.
The point selection will be removed from the original object(s).
Eventually present trim curves will not be honored properly.
See also the documentation of the corresponding scripting interface commands splituNP, splitvNP and the related tool for curves Split Tool.
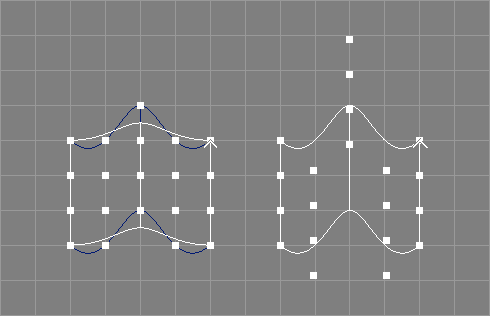
The interpolate surface tool takes a number of NURBS patches from the selection and requests an additional parameter o.
The patches will be modified so that they interpolate all original control points with the desired interpolation order o. See also the image above.
The point selection will be removed from the original object(s).
See also the documentation of the corresponding scripting interface commands interpuNP and interpvNP.
The rescale knots to range surface tool takes a number of NURBS patches from the selection and requests a range.
The knot vectors of the patches will be scaled, so that their first and last values match the given range. Trim curves, if present, will also be scaled to match the new range.
Since Ayam 1.20 the knot type of the surface does
not have to be "Custom" anymore. Furthermore, rescaling the knots
does not change the knot type.
This tool does not change the geometry of the patches.
See also the documentation of the corresponding scripting interface command rescaleknNP and the related tool for curves Rescale Knots to Range Tool.
The rescale knots to mindist surface tool takes a number of NURBS patches from the selection and request a minimum distance value.
The knot vectors of the patches will be scaled, so that no two knots have a distance smaller than the given minimum distance (except for multiple knots). Trim curves, if present, will also be scaled to match the new range.
Since Ayam 1.20 the knot type of the surface does
not have to be "Custom" anymore. Furthermore, rescaling the knots
does not change the knot type.
This tool does not change the geometry of the patches.
See also the documentation of the corresponding scripting interface command rescaleknNP and the related tool for curves Rescale Knots to Mindist Tool.
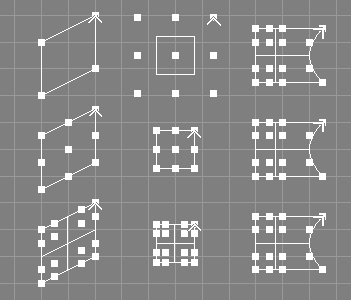
The make compatible tool takes a number of NURBS surfaces from the selection and requests a side and a level.
The surfaces will be made compatible, so that, based on the side and level parameters given, they are of the same orders, width/height, and defined on the same knot vector.
This tool does not change the geometry of the surfaces. However, since clamping, degree elevation, and knot insertion may be used on the surfaces, their order, knot vectors, and control points may be changed.
The orders of all surfaces will simply be raised to the maximum order of all surfaces; no attempt is made to check, whether lowering orders leads to a simpler result.
The point selection will be removed from the original objects.
See also the documentation of the corresponding scripting interface command makeCompNP and the related tool for curves Make Compatible Tool.
These tools convert between parametric objects.
The extract curve tool takes the first of the selected objects from the selection.
The tool creates an instance the first of the selected objects then creates an ExtrNC object and moves the instance to it.
|-NPatch             |-NPatch
             ==>     +-ExtrNC
                      \-Instance_of_NPatch(Instance)
This tool uses the object clipboard to move the objects around so that the original clipboard contents are lost when this tool finishes.
See section ExtrNC Object for more information regarding the ExtrNC object.
The extract patch tool takes the first of the selected objects from the selection.
The tool creates an instance from the first of the selected objects then creates an ExtrNP object and moves the instance to it.
|-NPatch             |-NPatch
             ==>     +-ExtrNP
                      \-Instance_of_NPatch(Instance)
This tool uses the object clipboard to move the objects around so that the original clipboard contents are lost when this tool finishes.
See section ExtrNP object for more information regarding the ExtrNP object.
See also the documentation of the corresponding scripting interface command extrNP.
The break into curves tool takes all NURBS patches from the selection and requests a direction parameter.
The selected NURBS patches will be broken into NURBS curves,
along the given direction (U or V). If the option "ApplyTrafo" is set,
the transformations of the NPatch objects will be applied to the
control points and the NCurve objects will be created with default
transformation attributes, otherwise the NCurve objects will get the
transformation attributes of the respective NPatch.
|-NPatch             |-NPatch
                     |-NCurve
             ==>     |-NCurve
                     |-NCurve
                     |-NCurve
The original NURBS patch objects are not deleted. See also the documentation of the corresponding scripting interface command breakNP.
The build from curves tool takes a number of NURBS curves from the selection.
The selected NURBS curves will be parsed, all curves that are of equal length or longer than the first selected curve will be used to form a new NURBS patch of the following dimensions: Width: length of the first selected curve, Height: number of used curves. The order in U direction (Order_U) will be equal to the number of used curves for numbers of two to four and four for bigger numbers of used curves. The knot type in U direction (Knot-Type_U) will always be NURB. Other parameters (Order_V, Knot-Type_V, Knots_V) are taken from the first curve.
|-NCurve               |-NCurve
|-NCurve               |-NCurve
|-NCurve     ==>       |-NCurve
|-NCurve               |-NCurve
                       |-NPatch
The original NURBS curve objects are not deleted.
See also the documentation of the corresponding scripting interface command buildNP.
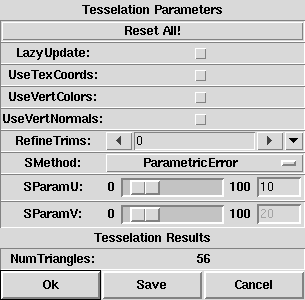
The tesselation tool takes all NURBS patches and NURBS patch providing objects from the selection.
A modal dialog box (see image above) will pop up,
that allows to select a tesselation method via a drop-down menu
and to tune the corresponding tesselation parameter(s) using a slider and
an entry widget. The initial method and parameter values will be derived
from the "TP" tag of the first of the selected objects (if it has such
a tag).
The selected or provided NURBS patches will be tesselated with the chosen method and parameters. The PolyMesh objects created by the tesselation will immediately be displayed in all view windows instead of the original objects. Whenever tesselation method or parameters are changed, the tesselation will be recomputed and displayed, thus, allowing an immediate estimation of the tesselation quality and the number of created polygonal elements.
If the option "LazyUpdate" is enabled,
updates of the tesselation that normally occur while dragging the
slider(s) will be deferred until the mouse button is released.
The initial value of this option will be determined from the
"LazyNotify" preference setting.
The options "UseTexCoords" and "UseVertColors" control processing
of texture coordinates and vertex colors stored as PV tags in the objects
to be tesselated (see also section
PV Tag).
When enabled, the resulting PolyMesh objects will
also have PV tags of the respective type.
Note that the PV tags must be named as defined by the hidden preference
options "PVTexCoordName" and "PVColorName" respectively. By
default those are set to "st" and "Cs".
If the "UseTexCoords" option is enabled, but no matching PV tag
is present, texture coordinates will be generated from the data
provided by a TC tag or (if no TC tag is present) from the knot
values of the NURBS surfaces to be tesselated.[*]
See also section
TC (Texture Coordinates) Tag.
The option "UseVertNormals" controls processing of
vertex normals stored as PV tags in the objects to be
tesselated (see also section
PV Tag).
When enabled, the resulting PolyMesh objects will have normals derived
from these tags instead of normals derived from the NURBS surface.
Note that the PV tags must be named as defined by the hidden preference
option "PVNormalName". By default this is set to "N", so that
a correct example tag looks like this:
PV N,varying,n,4,0,0,1,0,0,1,1,1,0,0,0,1
The option "RefineTrims" controls how many times the trim
curves are to be refined before tesselation for improved tesselation
fidelity along trim edges.[*]
The option "Primitives" allows to keep the quads created
by the tesselation (mode "TrianglesAndQuads") or
to synthesize new quads from compatible
triangles (mode "Quads").[*]
If the "Ok" button is pressed, the tesselation tool will be
closed and all selected objects will be replaced by their tesselated
counterparts. The original objects will be deleted.
If referenced/master objects are among the selected objects or their
children, and if any of their references are not selected or a child
of the selected objects (i.e. would not be deleted also), then those
master objects will not be deleted but moved to the clipboard instead.
If the "Save" button is used, the tesselation dialog will be
closed and "TP" tags containing
the currently selected method and parameter value will be added
to all selected objects.
These tags can be evaluated later, when the respective
objects are converted to PolyMesh objects (e.g. upon export).
Since Ayam 1.11 the conversion mechanism of objects keeps the
"TP" tags intact, so that e.g. tesselation parameters saved
to a Sphere or a Revolve object will also be preserved, and can
also be used later when the object will eventually be converted to
a PolyMesh (via a NURBS patch).
If "Cancel" is used, the dialog will be closed
and all selected objects remain unchanged.
The tesselation tool will block most other parts of Ayam while it is running, i.e. it is not possible to change the selection or run other tools. It is, however, possible to adjust view parameters while the tesselation tool is open, to examine the tesselation result more closely or from different viewing angles.
The values of the parameter slider bounds may be changed by simply entering
values that are out of the current bounds into the respective entry widget,
then pressing the <Tab> key. Range and resolution of the slider
will be recalculated automatically from the value in the entry widget.
PV tags that do not provide enough data for the surface to be tesselated will be silently ignored.
The PolyMesh objects created by this tool will not be optimized.
See section Miscellaneous Preferences for a more extensive discussion of the tesselation methods and their parameter(s).